Integrity Tutorial: Nested Objects
Numbers, Strings, Booleans - sometimes that's just not enough. With Java, we have a clearly object-oriented language, so why not test whole objects? Integrity can do that, and this tutorial will teach you the basics!
Project Setup
We will again require a basic setup as described in Getting Started. Create a new project named "NestedObjects", then add the Integrity libraries to it and create a package integrity.tutorial.nestedobjects.
Our example will be a bit more complex this time. We'll implement a tiny, object-oriented accounting system. It will have "users" identified by a "name" which consists of two strings: first and last name. Each user can have an arbitrary number of "transactions" attached to him, whereas each transaction has a subject string identifying its purpose and an amount. The account value for each user is calculated by adding up all transactions. This UML diagram demonstrates the business object structure:
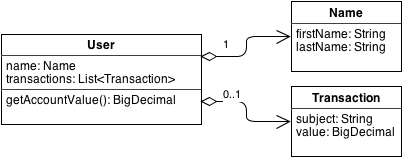
But don't worry - you won't need to type out the classes for yourself. They're provided on this separate page for your copy-and-paste pleasure!
Creating the Fixture Methods
Now that we have an object model, we'll need some fixtures to provide the "glue" between Integrity test scripts and your Java classes. In a real accounting system, you would of course have some proper kind of persistence for your data, but in order to keep things simple we'll just store a single user in a static variable. Disclaimer: Don't do this at home ;-).
We'll start with the following fixture class, which already has a method to create a new user. The method gets the first and last name and creates the user in our improvised "in-memory database". It is of course intended to be used in a call.
package integrity.tutorial.nestedobjects;

import de.gebit.integrity.fixtures.FixtureMethod;
import de.gebit.integrity.fixtures.FixtureParameter;

public class AccountingFixture {

	private static User user;

	@FixtureMethod(description = "Create the user with name $firstName$ $lastName$")
	public void createUser(@FixtureParameter(name = "firstName") String aFirstName, @FixtureParameter(name="lastName") String aLastName) {
		Name name = new Name();
		name.setFirstName(aFirstName);
		name.setLastName(aLastName);

		user = new User();
		user.setName(name);
	}

}
We'll also need a method to test the currently stored user data. This method will be very simple: it just returns the object! You will see later on how that simple approach can be used to test basically everything about the user. Note how this fixture method uses the "descriptionCall" and "descriptionTest" parameters in its annotation to provide different description texts if used in a "test" or a "call" - a very useful feature to ensure beautifully readable result reports when fixtures are used in both functions.
	@FixtureMethod(descriptionCall = "Get the currently stored user", descriptionTest = "Check the currently stored user")
	public User getUser() {
		return user;
	}
And finally, we want to be able to add transactions. Since we'd like to be able to add multiple transactions with one single call, we won't implement it like the "createUser" method - by providing the sub-objects' properties directly - but we will provide whole "Transaction" objects instead. And since multiple objects should be possible, our parameter must be an array:
	@FixtureMethod(description = "Add some new transactions to the current user")
	public void addTransactions(@FixtureParameter(name="transactions") Transaction[] someTransactions) {
		user.getTransactions().addAll(Arrays.asList(someTransactions));
	}
That's it - we're all set! Now it's time to write the first lines of Integrity code. Those will of course consist of two parts again: a fixture definition and the actual suites. The fixture definition comes first - create a file in the "integrity" folder named "fixtures.integrity" with the following content:
packagedef nestedobjects.fixtures with

	calldef createUser uses integrity.tutorial.nestedobjects.AccountingFixture#createUser
	testdef user uses integrity.tutorial.nestedobjects.AccountingFixture#getUser
	calldef addTransactions uses integrity.tutorial.nestedobjects.AccountingFixture#addTransactions

packageend
Writing the first test suite
First of all, a user needs to be created and named. It makes sense to validate the stored user right afterwards, to ensure that the user creation has gone well and the name has been assigned correctly. The Integrity script for this is pretty straightforward, but you might notice a new notation in there:
import nestedobjects.fixtures.*

packagedef nestedobjects with

	suitedef rootSuite with
		call createUser firstName: "John" lastName: "Doe"

		test user = {
				name: {
					firstName: "John"
					lastName: "Doe"
				}
			}
	suiteend

packageend
The construct used to express the user object here is called "nested objects" - "nested" because you can create pretty much any nested (and non-nested as well, of course) object structure with them. The syntax is derived from JSON: a sleek notation for key-value-pairs, wherein the value can be any kind of static value or a variable, including another complex object, of course!
If you copy-pasted the test suite above, I highly suggest to remove the nested object part (between the outer '{' and '}') and re-write that one from scratch! Just try to use auto-completion to make the job easier: you'll notice that Integrity will suggest the proper object properties from the "User" object in the outer nested object, while suggesting properties from the "Name" object in the inner nested object. Integrity is able to get that information by exploring the class you stated as return type in the "getUser" method.
Now, create a launch configuration to run the test. Use the ConsoleTestExecutor class as described in the first tutorial. The following parameters are used this time:
-x result.html -n "Nested Object Test" nestedobjects.rootSuite integrity
There's a new parameter introduced this time: "-n" or "--name", if you like it long, allows you to state a name for your test execution. This name will be presented in the result file and is a simple, but effective way to distinguish between multiple test runs you might want to set up for your own software! It is also used to list test results in the Jenkins plugin, by the way.
The result file should look like this:
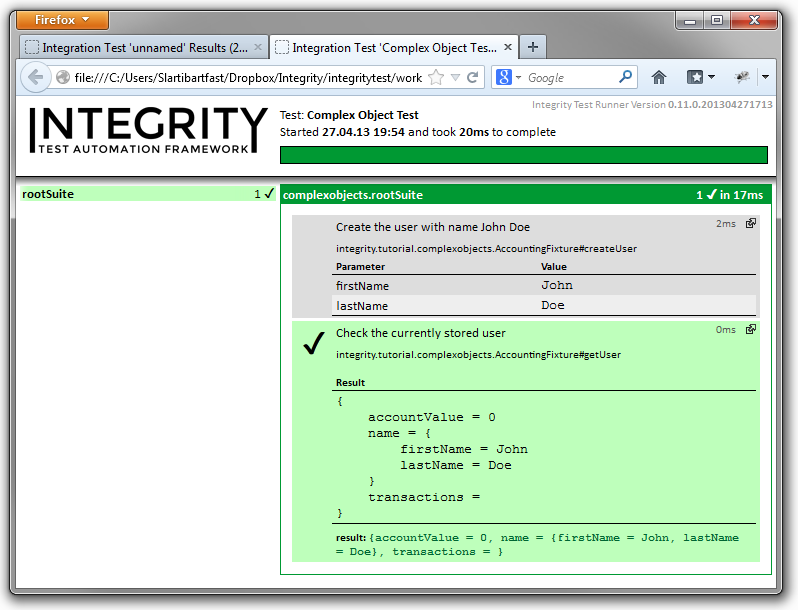
Fine, our new user is correctly set up :-) just for the fun of it, try to deliberately break things by modifying the user name a bit:
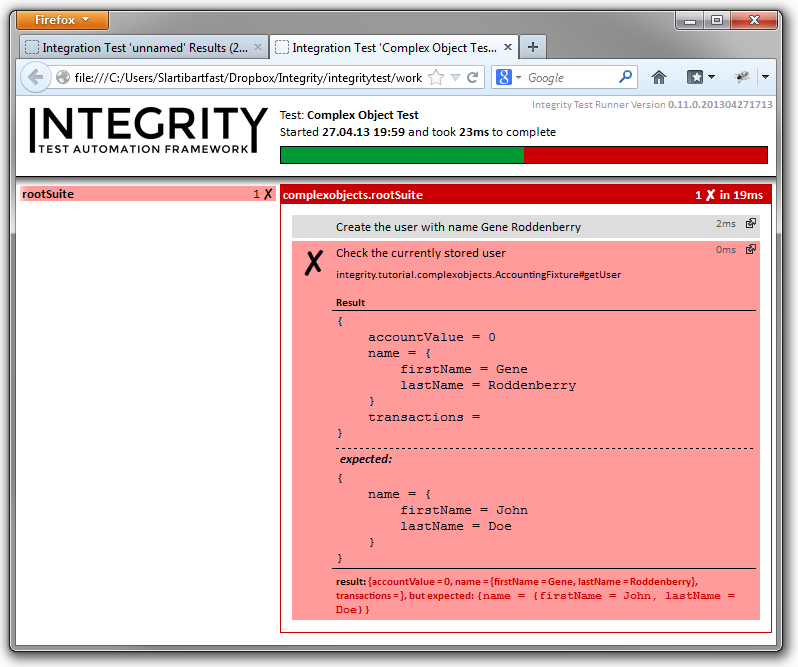
Besides seeing that the test actually fails if the names don't match, you can learn another important detail from this: the object that is actually returned is allowed to contain additional properties which are not covered by the expected data in the test! The test is considered successful if the values provided are all found.
Adding some transactions
Now let's create two transactions and add them to the user's account. We've created a fixture before which does exactly this job, and since we have created it such that it is able to accept an array of transactions to add, we can add the two with just one call:
-- Add two transactions to the users' account
call addTransactions transactions: {
subject: "Lottery Win"
value: 1000.00
}, {
subject: "Cash Withdrawal"
value: -220.00
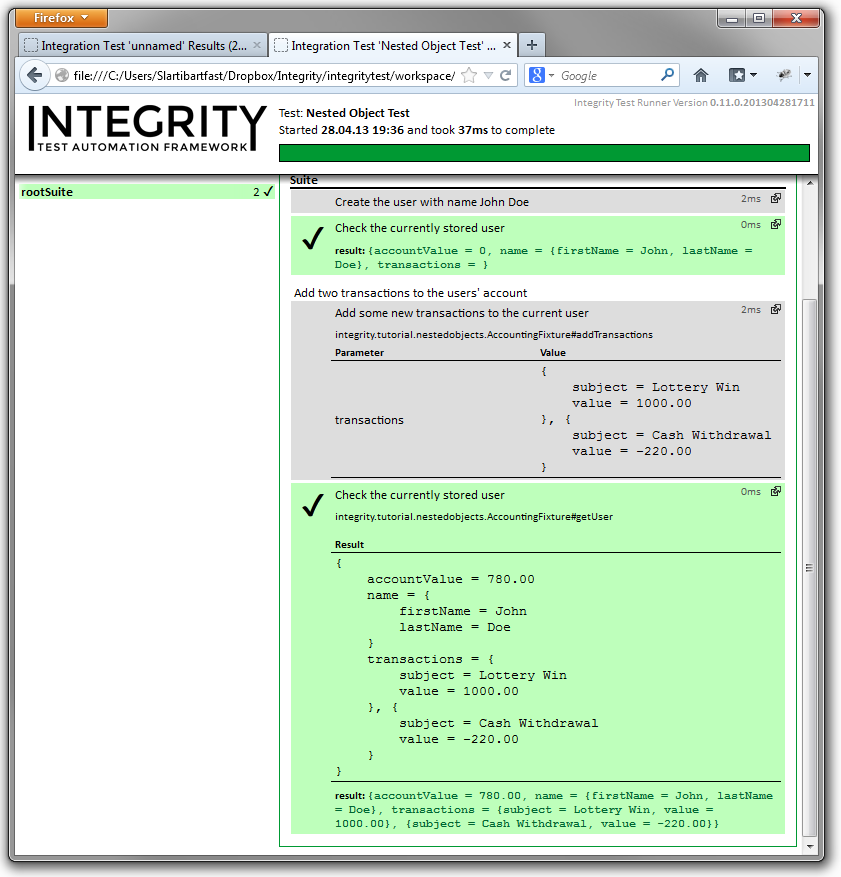
}If everything worked out correctly, we should have a user account with a balance of 780.00 and two transactions. We will test this next:
test user = {
		name: {
			firstName: "John"
			lastName: "Doe"
		}
		transactions: {
			subject: "Lottery Win"
			value: 1000.00
		}, {
			subject: "Cash Withdrawal"
			value: -220.00
		}
		accountValue: 780.00
	}
As you can see, we again simply specify every attribute of the user account we want to test in the way we expect it to be. This time, we also want to test the total account value (don't worry if the "accountValue" attribute doesn't show up in the autocompletion - that's due to a limit in the current autocompletion implementation which is currently only able to find getters backed by actual attributes; the test execution can deal with those just fine though).
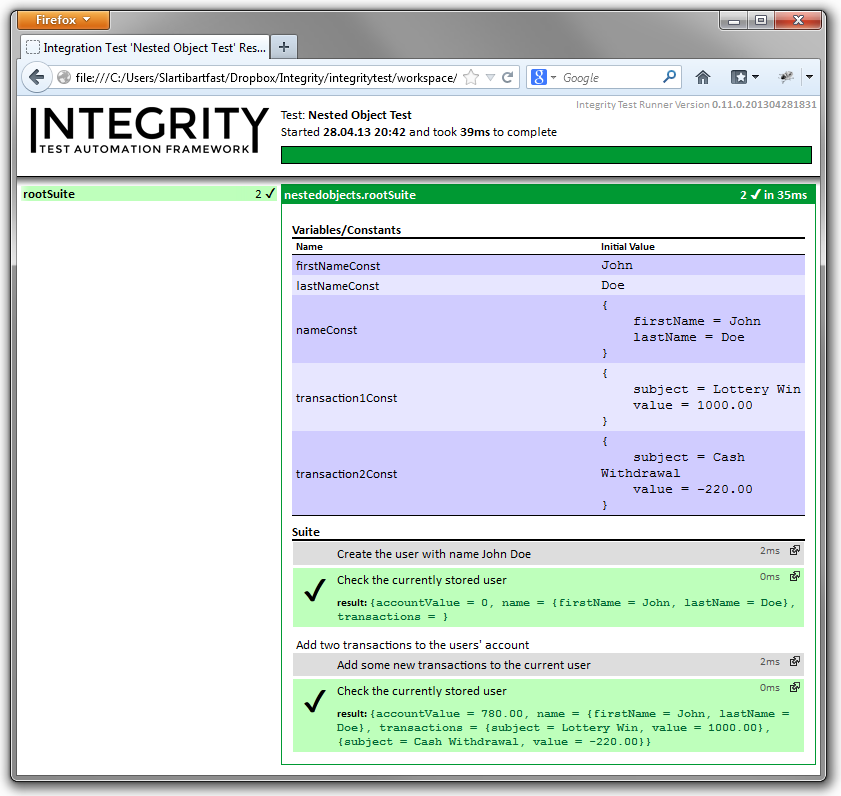
When running this test, you should get a result similar to this:
Restructuring the test script
The test runs fine, that's good :) but there's quite some repetition in the script. We do repeat the first/last name pair as well as the whole "name" object and the "transactions" object, too. Take a look at the following variation of the test script, which has been refactored to use some constants to eliminate repetition:
import nestedobjects.fixtures.*

packagedef nestedobjects with

	suitedef rootSuite with
		constant firstNameConst "John"
		constant lastNameConst "Doe"

		call createUser firstName: firstNameConst lastName: lastNameConst

		constant nameConst {
			firstName: firstNameConst
			lastName: lastNameConst
		}

		test user = {
				name: nameConst
			}

		-- Add two transactions to the users' account
		constant transaction1Const {
			subject: "Lottery Win"
			value: 1000.00
		}
		constant transaction2Const {
			subject: "Cash Withdrawal"
			value: -220.00
		}

		call addTransactions transactions: transaction1Const, transaction2Const

		test user = {
				name: nameConst
				transactions: transaction1Const, transaction2Const
				accountValue: 780.00
			}
	suiteend

packageend
When you run this refactored test suite, you will get the exact same result as before - with just one difference: you can see the constants which are defined with our test data.
Conclusion
So that's it for this tutorial - you now know the basics about using nested objects in Integrity to work with pretty much any kind of Bean hierarchy on the Java side. Feel encouraged to experiment a bit more with the little sample you've created!