Integrity Tutorial: Calls and Variables
This guide aims to introduce you to the variable mechanism in Integrity, as well as the call fixture type that can be used to fill variables with values. As a "side effect", you will also see how to use the Integrity Test Runner Eclipse plugin to monitor and control test execution.
It is highly suggested to finish the Getting Started tutorial first, because there will be references to that guide within this one, and the project setup is very similar.
Project setup
We will require a basic setup as described in Getting Started. You should thus create a new project named "CallsAndVariables", then add the Integrity libraries to it and create a package integrity.tutorial.callsandvariables, in which we'll then need the following fixture class:
package integrity.tutorial.callsandvariables;

import de.gebit.integrity.fixtures.FixtureMethod;
import de.gebit.integrity.fixtures.FixtureParameter;

public class CallsAndVariables {

	@FixtureMethod(description = "Generate random number between $min$ and $max$")
	public int randomNumber(@FixtureParameter(name = "min") Integer aMin,
			@FixtureParameter(name = "max") Integer aMax) {
		return (int) (Math.random() * (aMax - aMin) + aMin);
	}

	@FixtureMethod(description = "Checks whether $number$ is greater than $min$")
	public boolean numberGreaterThan(@FixtureParameter(name = "number") Integer aNumber,
			@FixtureParameter(name = "min") Integer aMin) {
		return (aNumber > aMin);
	}

}
As you can see, there are two fixture methods present in this fixture class. The first one takes a minimum and maximum parameter and determines a random number between those two (yes, I know, generally it's not really desirable to have non-deterministic factors like random numbers inside automatic test sequences, but it's just for demonstration purposes). The second method determines whether a given number is greater than an other given number.
Variables in Integrity
Next, we will create an Integrity test script which calls the first fixture method and stores the result in a variable for later use. But first let me introduce you to the concept of variables in Integrity. It is rather similar to variables in most imperative programming languages in that there are basically two kinds of variables:
- Globally visible variables, which can be accessed from anywhere in your scripts
- Locally scoped variables, which are only valid inside the suite that they are declared
Every variable used in scripts has to be declared before it can be used. Both kinds of variables are declared in the same way, but at different locations: while all variables declared inside packages, but outside of suites are considered "global", those variables that are declared inside suites are local variables which are available inside that suite only.
Calling a fixture and storing the result
Now it's time to do some actual work! Create a folder called "Integrity" for your test scripts and a "fixture.integrity" text file inside it. This file should contain the following fixture declarations:
packagedef callsandvariables.fixtures with

	calldef randomNumber uses integrity.tutorial.callsandvariables.CallsAndVariables#randomNumber

	testdef greaterThan uses integrity.tutorial.callsandvariables.CallsAndVariables#numberGreaterThan

packageend
Notice that we declare two different types of fixtures this time, one using calldef and another one using the already-known testdef keyword. Both of them result in their respective method being executed by Integrity, but only in case of test fixtures, a comparison with an expected value is done. Call fixtures support a different feat: the result value they return can be stored in a variable for further use, for example as parameters for subsequent call or test fixtures.
To make everything a little bit more interesting, we are going to put the test suite into a different script file. You will notice that Integrity doesn't care much about the way in which you structure your script files: you may put everything into one file, create a new file for each fixture and suite definition, or anything in between (which I by the way recommend - you should definitely use the freedom Integrity gives you to structure your test suites in a suitable way).
Create a file named "suite.integrity" with the following content:
import callsandvariables.fixtures.*


packagedef callsandvariables with

	variable globalVar initially 5

	suitedef rootSuite with

		variable localVar

		call randomNumber min: 1 max: 10 -> localVar
		test greaterThan number: localVar min: globalVar

	suiteend

packageend
We'll go through this second file line by line, as there are several new constructs used there.
- The import declaration at the beginning does allow us to reference entities declared in the imported package by their simple name. import can be used to import single entities or just everything defined in a package, which is accomplished by using the wildcard operator as shown in the example. If that import wasn't there, we'd have to reference to our randomNumber call by mentioning its fully qualified name, which is callsandvariables.fixtures.randomNumber. This would work just fine, and may be the better solution in quite some cases, but just like you'll import most of the stuff referenced in other Java packages when writing a Java class, you'll very much want to use the import mechanic in Integrity quite a lot as well, as it often makes tests a lot more readable.
- The first variable declaration is placed outside of the suite defined later, thus making it a global variable. This global variable is then initialized with the value of 5.
- The second variable declaration is placed inside of the rootSuite, making localVar a local variable, only valid inside this single suite. It is not initialized at all, just declared for later use.
- Then there's the call to randomNumber, giving two parameters set to fixed values in the script. The result of that call, which is our generated random number (as you can see in the fixtures' Java code), is then placed in the localVar variable.
- Finally a test is being performed, again providing two parameters. When looking at the Java fixture code, you can see that the first parameter is compared against the second one using the "greater than" operator, with the fixture returning a boolean result value. Boolean results are special in one way: you don't have to specify an expected value in your test scripts when calling a test fixture that returns a boolean result (though you can, if you want!). The test is simply considered successful if the result is true, and failed if the result is false.
Now that's it - let's run our script!
Running the test script
You already know how to set up the launch configuration for the console test executor from the Getting Started tutorial. That setup will do just fine in this tutorial as well! The one thing that slightly differs is the command line:
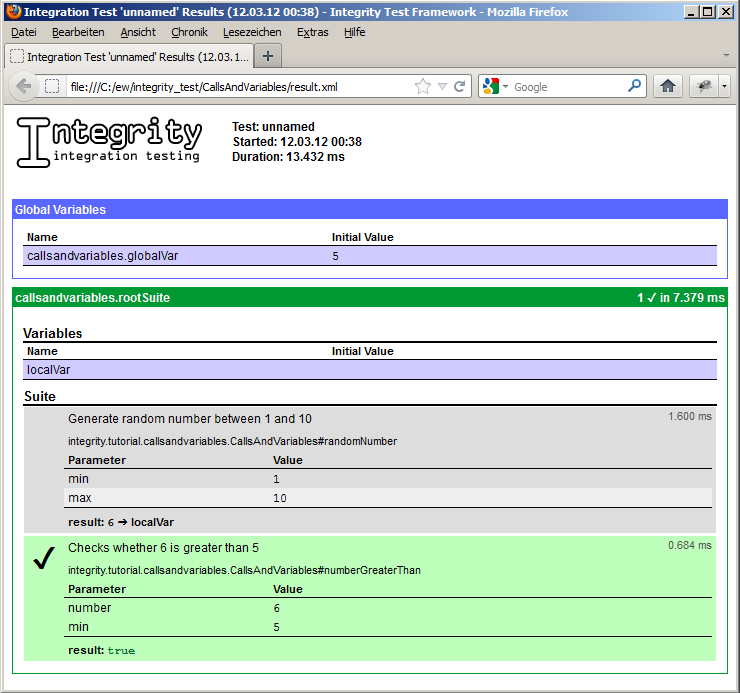
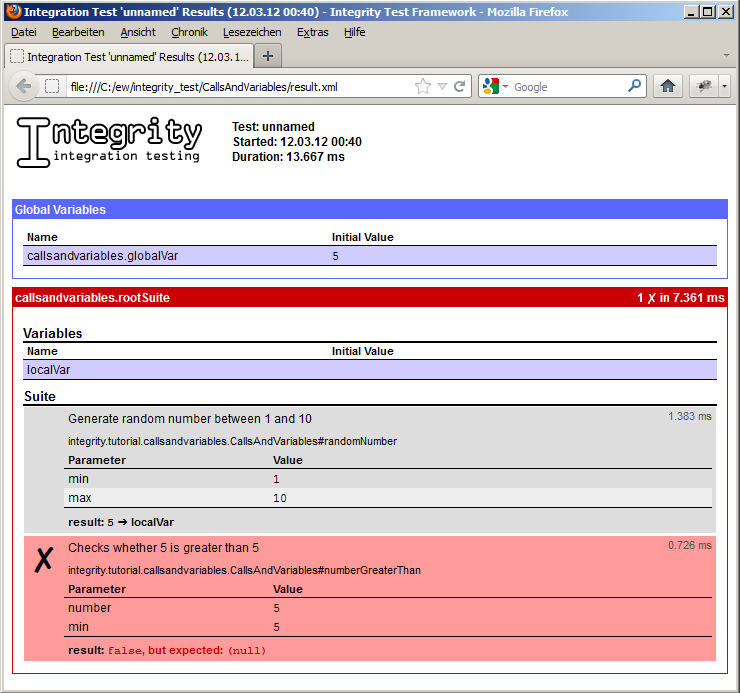
-x result.html callsandvariables.rootSuite Integrity
Remember that we made our test a little "non-determined" by introducing the randomization? Because of this, there's basically two possible results: the greaterThan comparison can fail or succeed, depending on the generated number. Try to run the test a few times to see this for yourself - in the end, this definitely proves that our randomly generated number is actually forwarded to the test fixture by means of our declared variable!
Taking a closer look at test execution
Now that we have multiple statements being executed, it is the right time to introduce you to another tool: the Integrity Test Runner Eclipse plugin. While the Test Runner is the runtime for execution of our test scripts, the similarly named Eclipse plugin is designed to control and monitor the Test Runner. This works both locally and remotely, as the communication between these two uses a TCP connection.
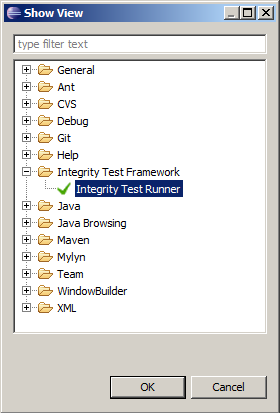
First, you'll have to open the view "Integrity Test Runner" via the Window -> Show View -> Other menu.
That will present you with the following new view:
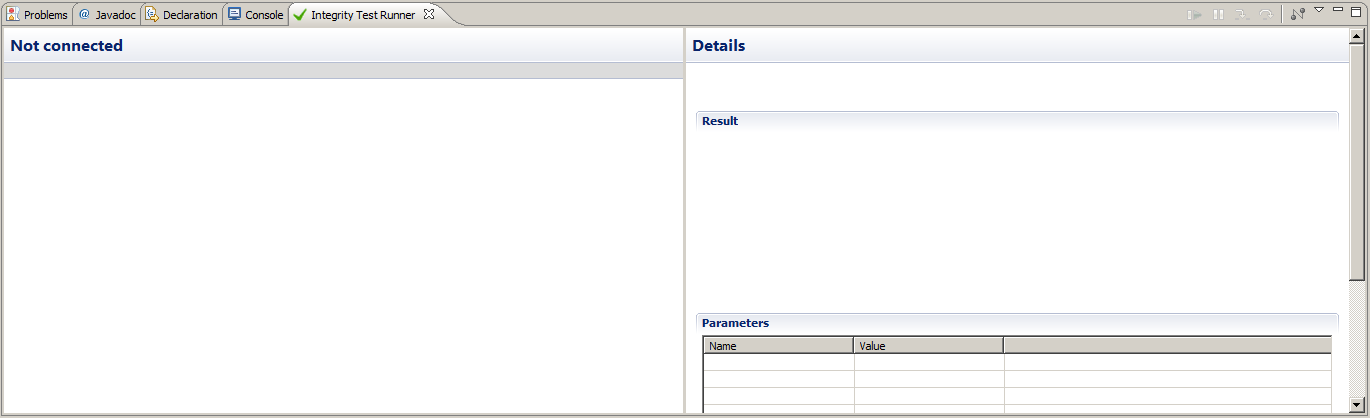
There's not much to see right now, as we haven't connected to a test runner yet. But the general layout is already visible: on the left-hand side, we will see the test script being executed in a tree-like form, and on the right-hand side, detail information can be requested for entries selected on the left.
In order to make it easy to connect to the test runner before it actually starts executing the tests, you can use the "--wait" parameter (or "-w" for short):
--wait -x result.html callsandvariables.rootSuite Integrity
Run the test runner launch config with these parameters, and you'll see that the test runner stops after resolving the test model. At this point, it waits for you to connect and manually start test execution! Use the button on the upper left of the Integrity Test Runner view to open the connection. The plugin will ask for the host to connect to - "localhost" is the default and just fine for now, as we do work locally right now. After a connection was established, the plugin will download the test execution script from the runner and display every single step that will be executed as soon as you start the run on the left:
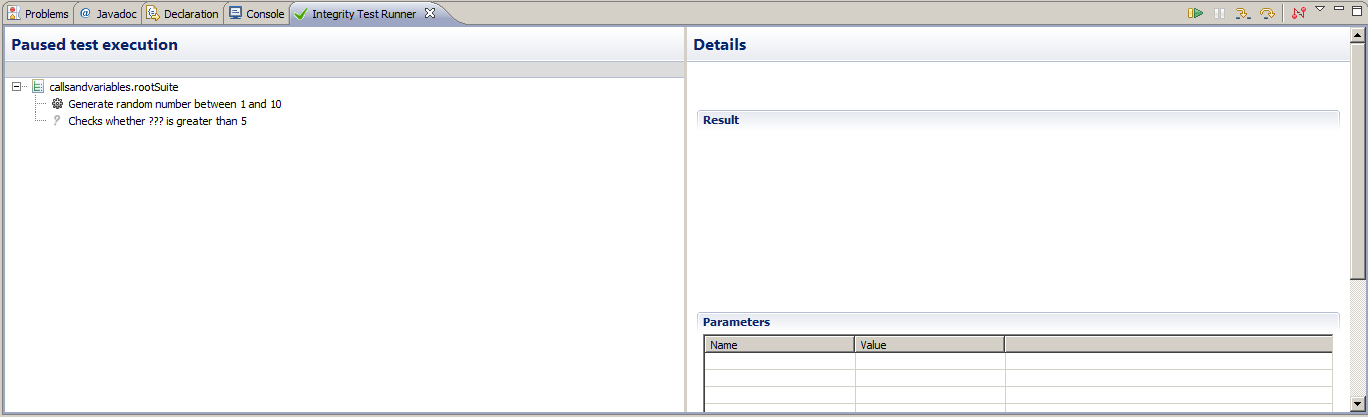
Notice that the second statement - our actual test statement - does have a block of ??? in its description text. These are there because the value that will be given to this test fixture isn't determined yet, as it will be returned by the first statement!
Now we'll exert some fine-grain control over the test execution process: We'll add a breakpoint at the second statement, so that the test runner will pause execution as soon as it reaches that statement. Right-click on the second statement to add the breakpoint.
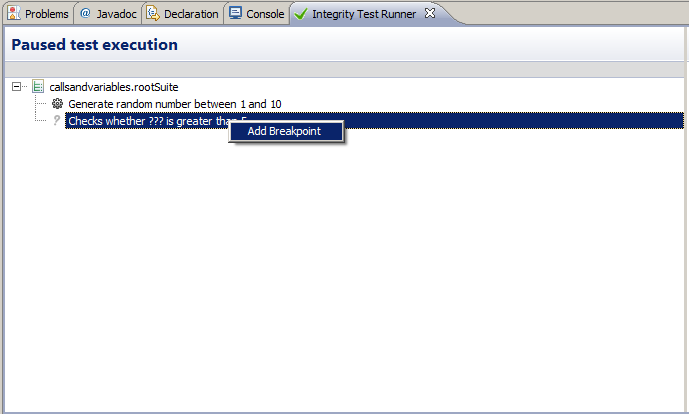
A small, black triangle will appear in that line - this is the visual indication of an active breakpoint. Now, start test execution with the "play" button on the upper right! You should arrive at something like this:
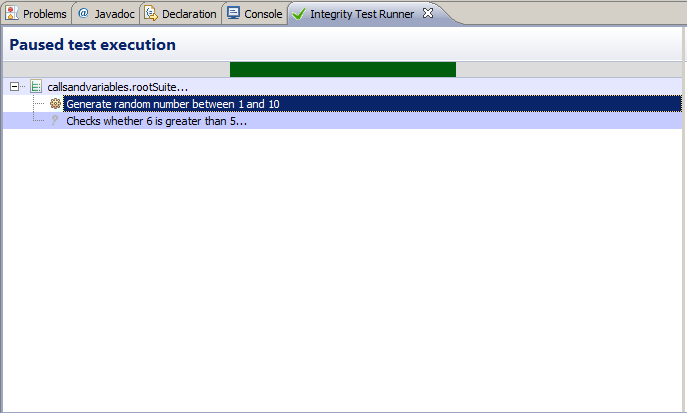
The first statement has been selected in order to take a look at its details on the right, but there's much more to see on this screen:
- The grey bar on the left has turned green in the middle. This bar is a kind of progress bar for test execution: it will fill up gradually, but unlike normal progress bars, the color of the "blocks" is dependent on whether a call/test was successful (green) or failed (red or orange; the latter being used in case of exceptions). Here you can see that the result of the whole suite is not yet determined (first 1/3 of the bar), but the first actual statement (second 1/3 of the bar) was finished successfully, and the second statement (third 1/3) is not yet determined as well.
- The blue marker on the left side (not the dark blue selection marker, but the lighter one below) denotes the statement that will be executed next. It is positioned at the statement we decorated with a breakpoint earlier, and the breakpoint has vanished (breakpoints are automatically deleted when execution reaches them and pauses).
- The block of ??? in the description of the second statement has been replaced by the actual value that will now be used when performing the test. This has been possible because the value is now determined: it's the result of the call executed before, as you can also see in the details panel.
You might also want to try double-clicking on one of the statements or the suite name. That opens up the corresponding test script and jumps to the corresponding line, which comes in handy when fixing test failures.
When you've finished investigating the situation, continue test execution by clicking "play" again! In our case, the final result looks like this:
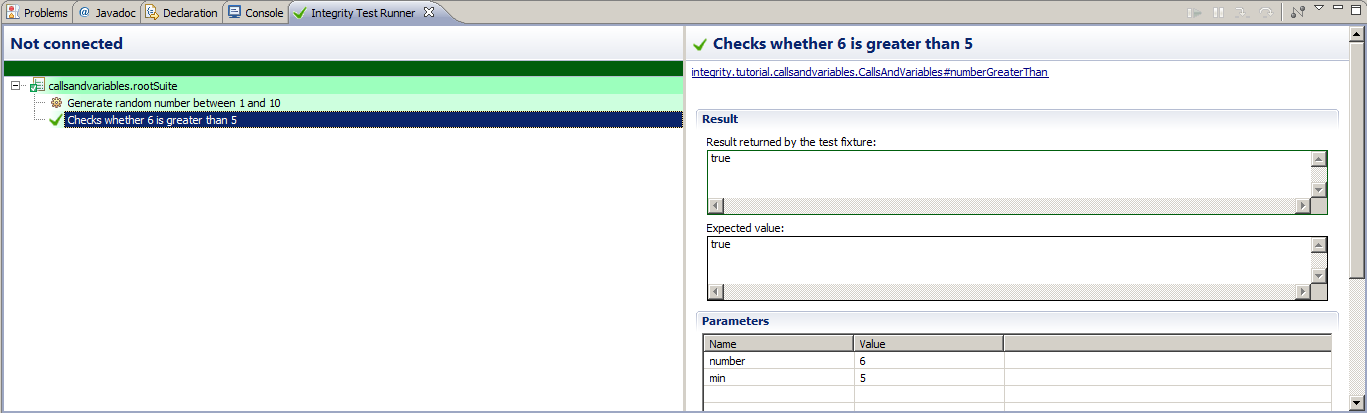
Of course, depending on the number that was generated randomly in your case, your result might differ - your test might have failed for example!
Experimentation...
Now that's it for the second tutorial. Feel free however to experiment a little bit further with your project! You might play around a bit with the single-stepping capabilities of the Eclipse plugin, or add some more variables, maybe in different suites as well. And I definitely encourage you to try the keywordconstant (instead of variable) when defining variables: constants are mostly used like variables, but you can't store any values in them other than the first value put there at definition time - basically like constants in most programming languages.
I plan to write some more tutorials in the future which cover a lot more of the basic aspects of Integrity in detail, and maybe even some more about the really advanced topics like table tests, arbitrary parameter fixtures, fixture factories or custom comparator fixtures. But that'll probably take some time ;-)