Integrity Tutorial: Table Tests
When you're writing your own tests, you will inevitably come across a situation in which you need to check some similar things "in a row" with slightly different input parameters. Tabletests exist for simplifying such situations and will make a great addition to your arsenal.
Project Setup
We will again require a basic setup as described in Getting Started. Please create a new project named "TableTests", then add the Integrity libraries to it and create a package integrity.tutorial.tabletests.
You'll create a simple fixture again which "tests" whether your processors' arithmetric units work correctly, but with a little new twist this time:
package integrity.tutorial.tabletests;

import java.math.BigDecimal;

import de.gebit.integrity.fixtures.FixtureMethod;
import de.gebit.integrity.fixtures.FixtureParameter;

public class TableTests {

	@FixtureMethod(description = "Add $numbers$ and multiply with $multiplier$")
	public long additionAndMultiplication(@FixtureParameter(name = "numbers") long[] someNumbers,
		@FixtureParameter(name = "multiplier") long aMultiplier) {
		long tempResult = 0;
		for(long tempNumber : someNumbers) {
			tempResult += tempNumber;
		}

		return tempResult * aMultiplier;
	}

}
Creating the root suite
The next part will probably be familiar for you as well. We'll need a directory for the test scripts named "Integrity" in the project root, and a file named "fixtures.integrity" inside that directory for the fixture definition:
packagedef tabletests.fixtures with

	testdef additionAndMultiplication uses integrity.tutorial.tabletests.TableTests#additionAndMultiplication

packageend
Another Integrity file with the name "suites.integrity" shall contain the root suite. Create this file and insert the following content. I'd highly suggest to not copy-paste it, but to type it instead, so you can see content assist as well as autoformatting for tables in action!
import tabletests.fixtures.*

packagedef tabletests with

	suitedef rootSuite with

		tabletest additionAndMultiplication
			| numbers   | multiplier | =  |
			| 1, 2, 3   | 1          | 6  |
			| "4", 5, 6 | 2          | 30 |
			| 10        | (2 + 2)    | 41 |

	suiteend

packageend
This small snippet does not only introduce tabletests for the first time, but contains some other interesting parts as well. Let's focus on the table first, then run the test, and finally take a look at the details.
As you can see, tables are basically simple constructs: there's a header line which specifies the order of the columns, followed by an arbitrary number of data lines. The pipe character is used to divide the columns, and the last column in this example is the result column, containing the expected result values. The default syntax highlighting color scheme with which you're probably familiar with already applies to tables as well: result columns are colored in blue, while test input is colored in dark red.
When this test is run, our fixture will be called three times in a row, each time with different input parameters. This is an important concept: fixtures for table tests don't differ at all from fixtures for normal tests! You can thus basically use any test fixture in a table test simply by specifying such a test with the "tabletest" keyword. It is however possible to tune some fixtures' behavior for table test scenarios: while a fixture is usually instantiated for each test statement, in case of table tests only one instance is used for the whole table test statement, thus this instance can for example keep an internal state in class attributes which is altered on each fixture method call.
Running the test
Running this suite works just like in previous tutorials: create a launch configuration (refer to the respective part of the Getting Started tutorial if you need a refresher) and state our root suites' fully qualified name in the command line:
--wait -x result.html tabletests.rootSuite Integrity
The "wait" statement indicates: we'll use the Integrity Test Control view again in this tutorial! Remember that one? If not, you might want to take a short look at the Calls and Variables tutorial again. But don't worry, I'll walk you through the whole process, since we're going to use a new feature this time as well: running launch configurations directly with the Test Control view.

The highlighted icon opens up a list of all your launch configurations. Just select one for launching - preferably the one you created in the previous step, of course.
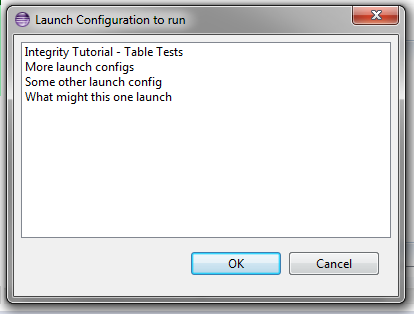
Noticed the sorting? Generally the list orders launch configs alphabetically, but if one config contains the keyword "Integrity", it will be moved right to the top ;-)
When a launch config is selected, you can use the "play" button to run that config and automatically connect to the test runner you just launched. There's also a "debug" button right next to it, which basically does the same, but runs the launch config in debug mode - quite handy when debugging fixture code.
Now, just launch the test! Due to the "wait" parameter we added earlier, test execution will automatically be paused. We'll utilize this situation to take a look at the way in which table tests are represented in the Test Control view:
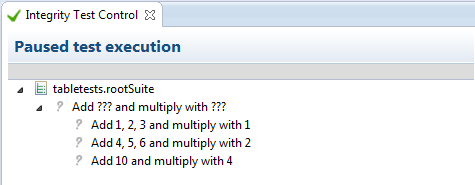
As you can see, each table line is transformed into one line below the test statement itself. That statement contains question marks at the positions which are obviously only known for each specific line.
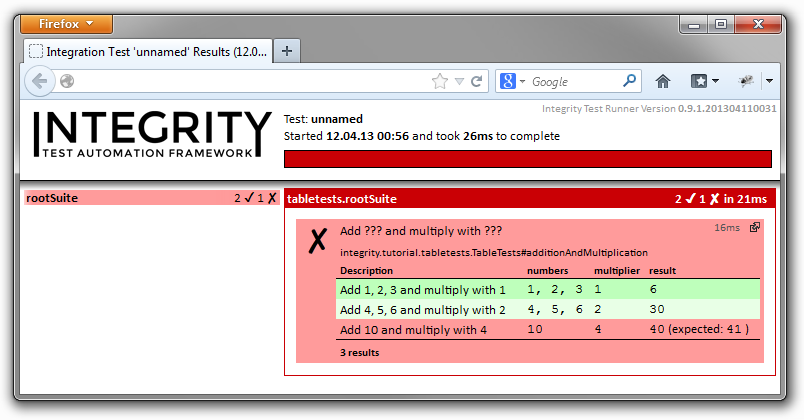
Kick off test execution now, and watch the result - Oops, seems we've made a mistake there!

The test result HTML file mirrors this result as well:
Another look at the table test
Now let's take a look at the other little details hidden in the table test statement:
tabletest additionAndMultiplication
	| numbers   | multiplier | =  |
	| 1, 2, 3   | 1          | 6  |
	| "4", 5, 6 | 2          | 30 |
	| 10        | (2 + 2)    | 41 |
The first thing to notice are the comma-separated values in the first column. These correspond to the "long[]" array stated as input parameters in the test fixture. Since the fixture accepts an array for this specific parameter, you may specify multiple values in your test scripts. Arrays are supported for basically every supported type in Integrity. But as you can see, single values work just as well - the fixture gets an array with a single element in that case. The other way round would of course lead to an error during test execution: it is not possible to specify multiple values for a fixture parameter which is not an array.
You might have also noticed the "4" in the second line - that's the way in which String values are expressed in Integrity. So the number 4 is actually a string, which will then be combined with two other numbers into an array of type "long". This works flawlessly due to Integritys' powerful autoconversion support - pretty much any value conversion which can be done without loss of information should be performed automatically! In this case, the string can easily be parsed to a number, so that's what is done on the fly. You might try to replace the string with something like "foobar" instead and watch the result: an exception is thrown, since that string can't be converted to a number.
The third nifty little detail is hidden in the third line: an inline calculation. The Integrity feature used here is called "standard operations", and it allows to formulate basic arithmetric calculations: +, -, *, /, % (modulo) and .. (string concatenation). Standard operations can be used in most situations in which static values could be used. (There's even another related feature called "custom operations", with which you can create your very own additional operations - but that being an advanced feature, it will be covered in detail in an own tutorial later.)
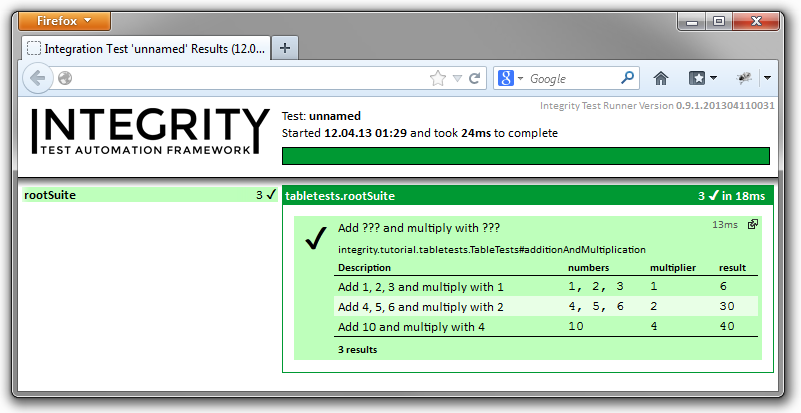
Enough details for now, let's fix that test result! The expected value is of course "40", which leads to a nice green result page:
In the last step, we'll modify the table test a bit, in order to show another table test feature. Try to run this variation of the test:
tabletest additionAndMultiplication multiplier: 2
	| numbers   | =  |
	| 1, 2, 3   | 12 |
	| "4", 5, 6 | 30 |
	| 10        | 20 |
See the difference? The multiplier is specified outside of the table! This is entirely valid - any parameter in a table test can be specified both in the form of a table column or as a "normal" test parameter before the tables' header line. In the latter case, the provided value is applied to all table lines, while the value may be different for each line in the former case.
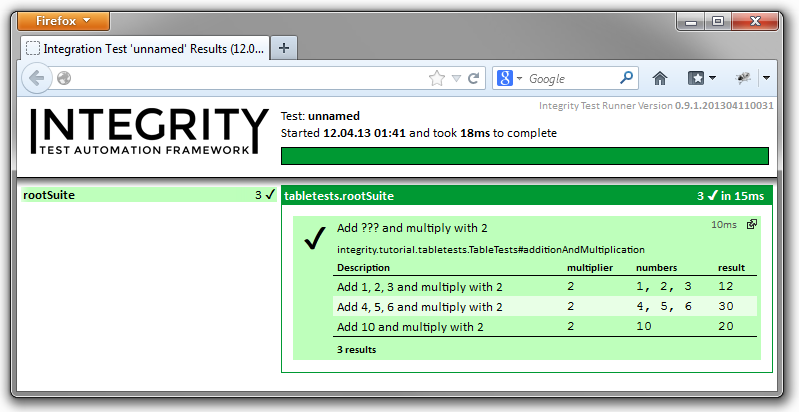
Take a closer look at the test statements' main result description line (the one right next to the big checkmark sign) to spot another nifty little detail: The line now states the fixed multiplier "2", whereas it stated "???" in place of that value before.
Conclusion
So that's basically it - you now know how to use tables in simple test scenarios. There are some more table-related features to explore, such as named result columns with which multiple test result checks can be performed in one line, or arbitrary results in table tests. But these are a bit out of scope of this basic tutorial and will be covered in separate tutorials.
Nevertheless, you are of course encouraged to play around a bit with the table test construct - maybe try adding a fixture class attribute which is then used in the fixture method, in order to explore the possibilities of "holding state" while a table test is being executed.
If you've got enough of tables, you may as well continue with the next tutorial, which covers "nested objects" - one of the most powerful features of Integrity when integrating the test framework with a real-life Java application!